So you’ve decided to start your next big venture and setup a YouTube channel.
Are you itching to become the next big YouTube star? Perhaps you want to gain some valuable online exposure for your brand. Or maybe you simply have a message you want to share. There is surely no better place to share your voice than YouTube, the world’s biggest video sharing network!
Here at Viewership, we talk a lot about growing your audience and building your business on YouTube. We encourage baby steps. Focus on getting your first 100 subscribers, then 1000. Keep creating videos and putting in the effort.
But in this post, we’re going to head back to the very beginning.
Before you can make money on YouTube, and before you can even build your YouTube audience, there is something you must do. And that is, of course, start your YouTube channel!
Consider this your official “YouTube for Beginners” tutorial, because I’m about to give you a complete step-by-step guide for how to setup a YouTube channel. I’ll take you through the whole process and teach you what you need to know.
Let’s create your YouTube channel!
How to set up a YouTube Channel: the step-by-step guide for beginners
Are you ready to learn everything there is about how to set up a YouTube channel?
Getting started can always be a little bit daunting, but don’t worry! We’re about to go through the whole process with a step-by-step tutorial so you can learn how to quickly and easily setup a YouTube channel.
Step 1: The Basics
It is time to take the first step towards your new YouTube career. Let’s break down the basics. First thing’s first: you need a Google account. (If you already have one, you can skip ahead to “Create your YouTube Channel” below.)
Create a Google Account
- Head to accounts.google.com and click on “Create account”.

- Fill in your details to create your Google Account. Click “Next step”.
- You will be asked to verify your Google Account with a verification code sent to your phone. (It may take a few minutes to arrive. Be patient!) Once you’ve submitted that code and authenticated your account, we’re ready to continue.
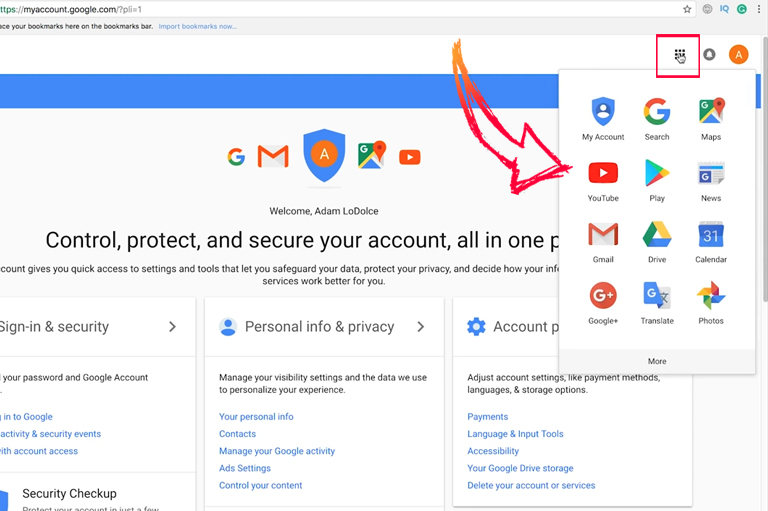
- Now that you have signed into your spiffy new Google Account, you’ll want to navigate to the Google Apps launcher in the top right corner of the screen. Click on the Google Apps icon and then select the YouTube icon. You’ll be taken directly to the YouTube homepage. It’s time to setup a YouTube channel!
Create your YouTube Channel
- Sign in to YouTube at the top right corner of your screen.
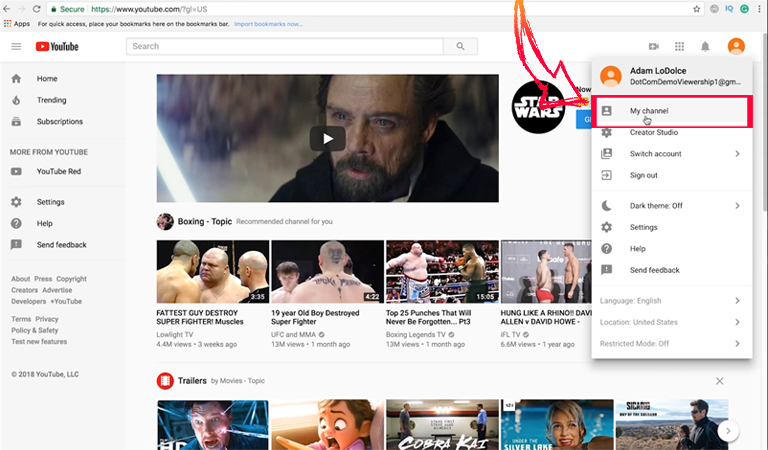
- Once you’ve logged in, click on your user icon on the top right. Then select “My Channel” from the drop-down menu.
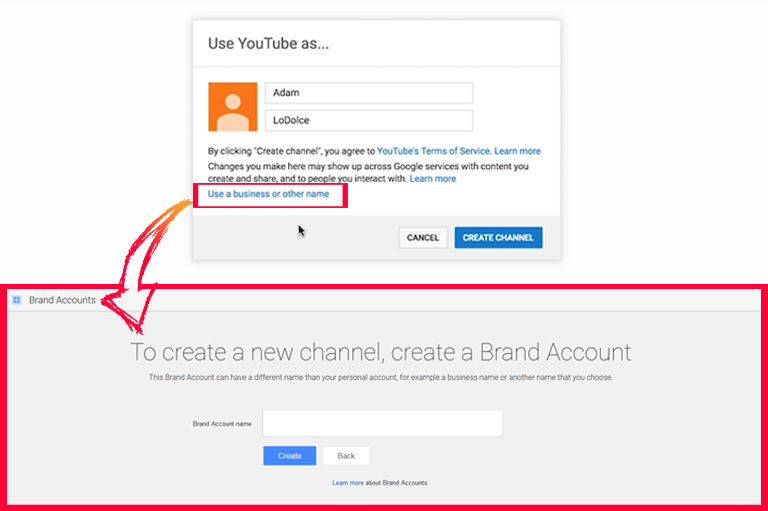
- You will see a new screen where you will be asked who you wish to “Use YouTube as…”. You can choose to “Create channel” using your Gmail details, or, in the case of a business account, you can select “Use a business or other name”. These types of accounts can have multiple managers or owners — perfect for if you want your YouTube marketing to be a collaboration with several team members.
- You will be asked to create a name for your Brand Account. Click “Create” to finish.
Congratulations! You have just completed the basic steps to setup a YouTube channel! But we’re not finished yet. Let’s continue with Step 2.
Step 2: Fill out the details of your YouTube channel
Your new YouTube channel is brand spanking new and ready to be branded. Right now, it’s empty and probably rather boring, right? It’s time to turn your channel from drab to fab by personalizing your account.
Channel icon
First, we want to change your channel icon. The icon is the small profile image that viewers will see over your channel cover art, on your videos, comments and so on.
- Select “Customize channel”.
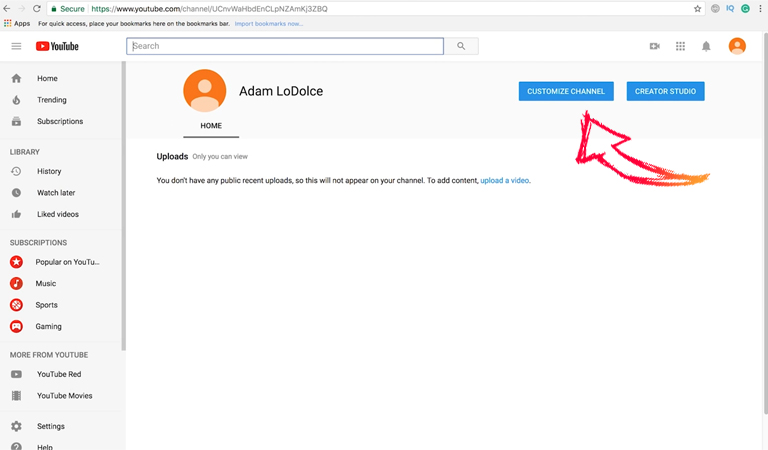
- Select the pencil button on your icon then click “Edit”.
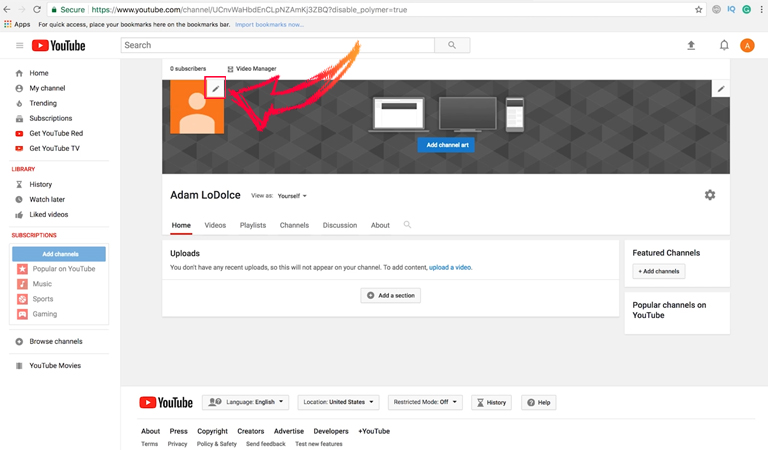
- Select “Upload photo”. You will then have the option to crop your image.
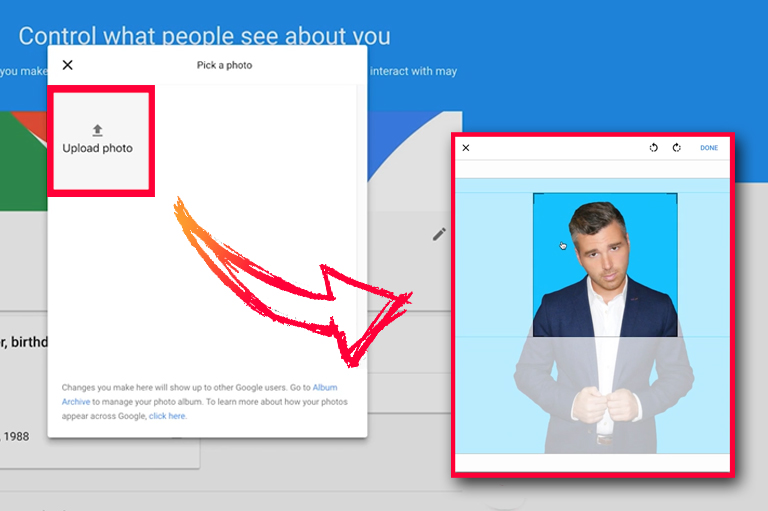
- When you’re ready, click “Done”.
YouTube recommends using an image at 800 x 800 pixels. Your icon will be rendered into a circle for most of its appearances on YouTube. Keep that in mind when you choose and crop your image.
It may take a few minutes for your new image to populate the channel icon, so don’t worry if it doesn’t appear immediately.
Channel art
Now it’s time to customize your YouTube account by adding the perfect channel artwork.
Personalizing your YouTube channel with channel art is another fantastic way to communicate who you are as a business and to stand out from the crowd.
Definitely do not leave the default art on your YouTube channel. It’s boring, it’s unbranded, and I guarantee every Tom, Dick or Harry who has every half-heartedly setup a YouTube channel will have that same cover.
Adding channel art is easy:
- Navigate back to YouTube using that nifty Google Apps launcher in the top right corner of your screen (or by heading to YouTube.com).
- From the YouTube homepage, click your icon in the top right corner.
- Go to “My channel”.
- Select “Customize channel.”
- Select “Add channel art”.
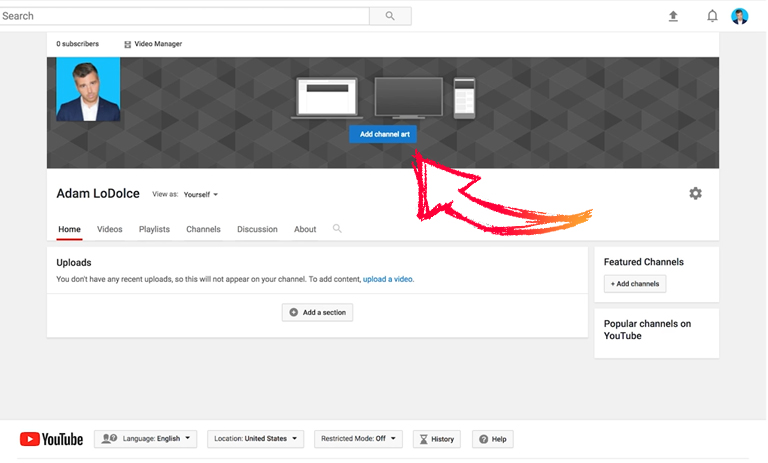
- Select “Upload photo”.
YouTube recommends uploading your cover photo at 2560 x 1440 pixels with a maximum file size of 4MB.
When you select an image, you will notice that YouTube provides a preview of how your channel art will appear on different devices (desktop, TV, and mobile). You can choose to “Adjust the crop” to ensure your image looks perfect on each device.
- Once you are ready, click “Select”.
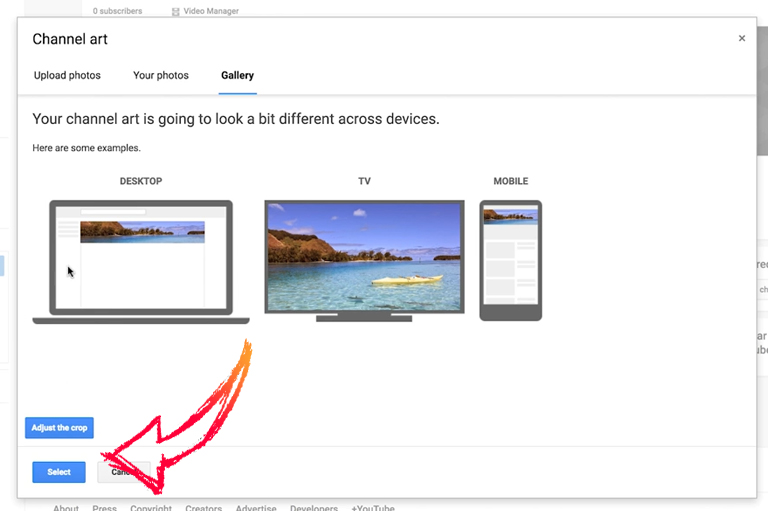
Ta-da! With a customized icon and cover art, your YouTube channel will be taking shape and boasting some unique personality.
Quick tip: The text and logo safe-area of your cover art is the 1546 x 423 pixel space in the middle. Be sure to keep any critical information (like branding, taglines, and text) within this area. Doing this will ensure all of the key components of the image appear as part of your channel art on every device.
Channel description
Next on the to-do list is to add a channel description.
- View your channel.
- Click on “Customize channel”.
- Navigate to “About”.
- Select the “Channel description” button.
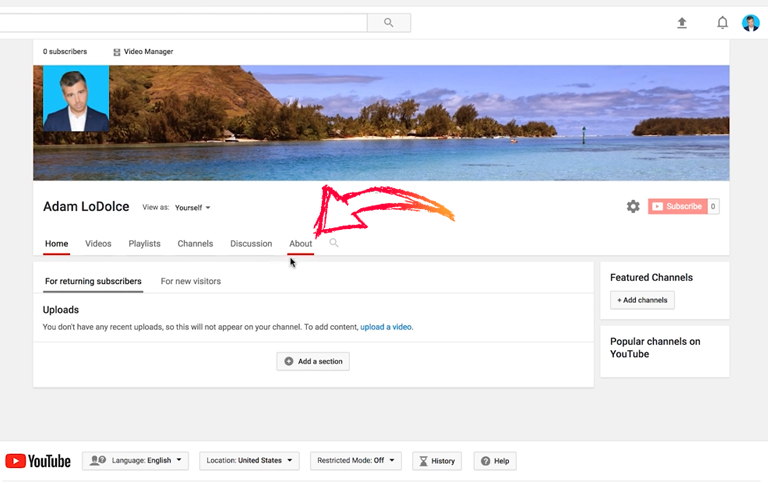
The channel description is your bio. This is where people will come to find out who you are, what you stand for, and why they should watch your videos.
Your channel description can include useful details like your email address or your location. You could provide a link to your website or social media accounts, or connect with other relevant channels in the “Featured Channels” section.
But more importantly, your channel description should give people a reason to subscribe to you. Ask yourself: Why are you here? What are your goals? Why did you want to set up a YouTube channel in the first place?
You may find it helpful to write down your value proposition. In other words, what is it that makes your channel different from every other YouTube channel out there?
A lot of content gets put on YouTube — 300 hours of video are uploaded every minute, in fact! You don’t want to become part of the crowd producing the same old content.
For many of you getting started, you may not have your channel ironed out. That’s okay! As you begin to grow your channel, you’ll discover your own creative flow and begin to develop a style of your own.
Don’t be afraid to adapt that style (or change it entirely) while you are getting started on YouTube. This is the time to experiment, figure out what works, and uncover how you will bring value to your audience in a way no one else can.
Step 3: Optimize your YouTube account
We’ve now completed some of the fundamental steps required to setup a YouTube channel. But we need to put in a bit more work to break through the noise with optimized YouTube content.
Here are three simple things you can do right now to enhance your channel and get a leg-up over the competition.
Add contact details
If you have setup a YouTube channel as a business or a brand, it is a good idea to include your contact details in the “About” section of your channel.
- Navigate to “About”, as above.
- Scroll down to “Details”.
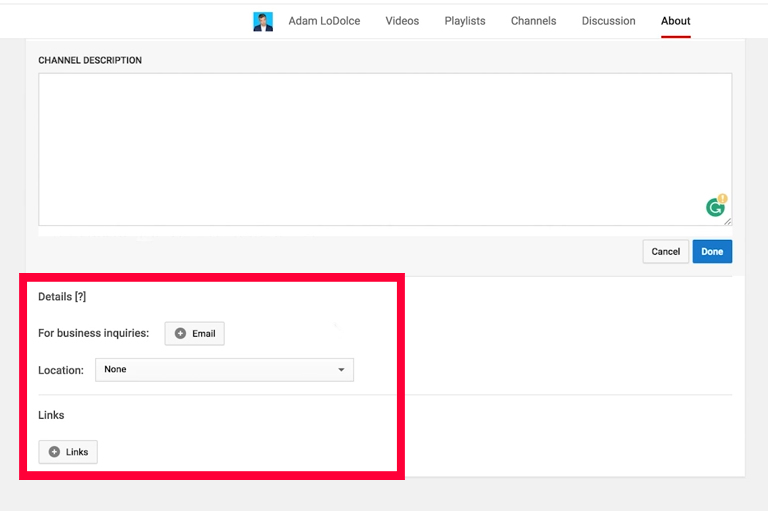
Share your business email address so anyone who is interested in your work can easily contact you.
Add links
Allow your audience to quickly access the other marketing avenues of your business by adding links to your YouTube channel.
- Go to your channel homepage. Select “Customize channel” and click the “cog” icon beneath your channel art.
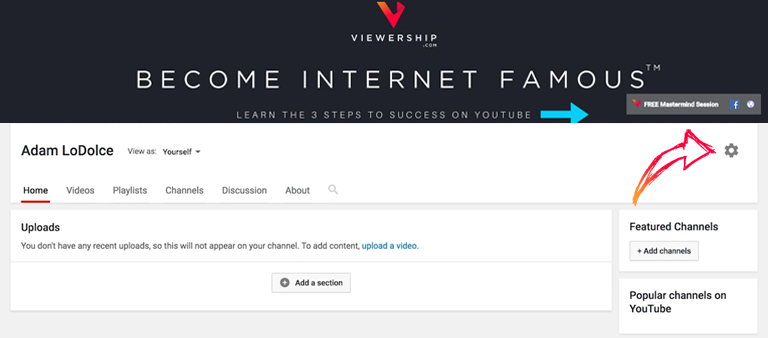
- “Channel Settings” will appear. Enable the “Customize the layout of your channel” option.
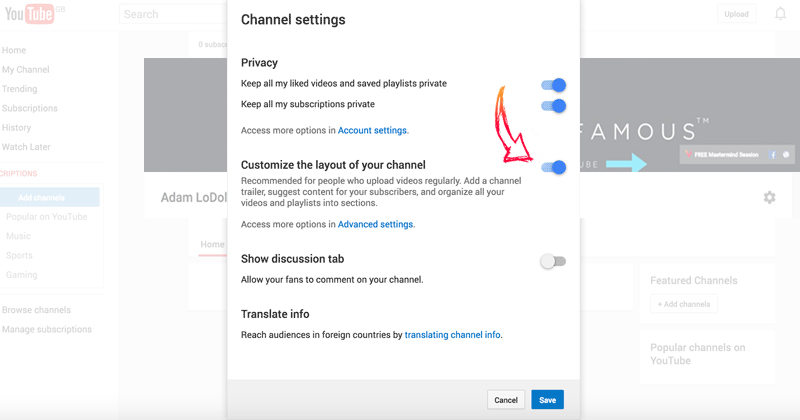
- Click “Save” and head back to your channel homepage.
- Now that customizations have been enabled, you can find the “Edit links” option in the top right corner of your channel art.
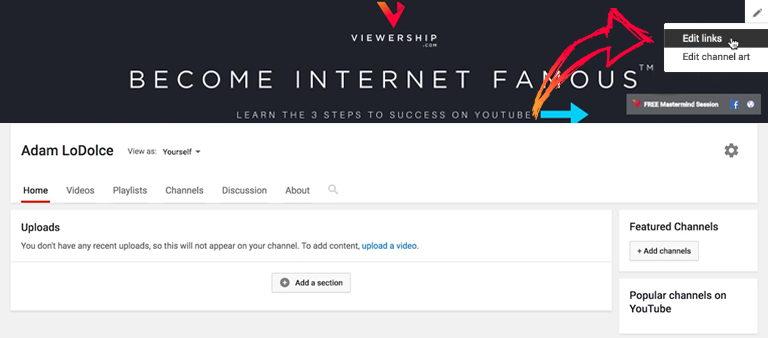
- Click “Edit links” to be taken to the “About” page.
- Add links and choose how many will appear on your channel art.
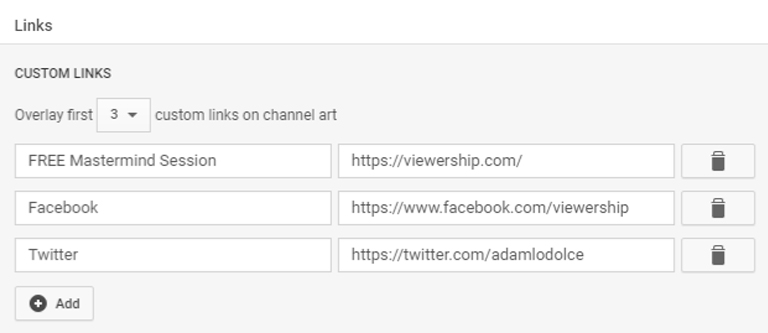
You can add links to your website, email address, many different social media networks, merchandise providers and much more. Including these links provides opportunities for your viewers to become long-term followers of your brand. Keep those lines of communication open between your business and your audience!
Include a channel trailer
When you first setup a YouTube account, it can be easy to overlook the channel trailer. But in fact, your YouTube channel trailer could be one of the most influential methods of attracting new viewers.
Channel trailers are auto-play videos that appear only for people who have not yet subscribed to your channel. Good channel trailers are typically short and to-the-point. They grab attention and give viewers a clear picture of who you are and what type of content you create.
Here’s how to set a channel trailer for your YouTube account:
- As above, make sure you have turned on channel customization in your “Channel settings”.
- Upload the video you want to be your channel trailer.
- Navigate to “Customize channel”.
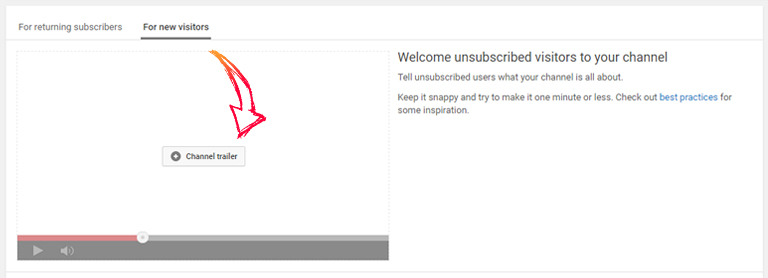
- Click the “For new visitors” tab.
- Click on “Channel trailer”.
- Select your channel trailer and click “Save”.
Step 4: Upload your first video
You’ve set up a YouTube channel, and you’ve got some content locked and loaded. The big moment has arrived — it is time to upload your first YouTube video! Here’s how:
- Click on your icon in the top right corner of YouTube and select “Creator studio” from the drop-down menu.
- Click on the “Upload” arrow in the top right.
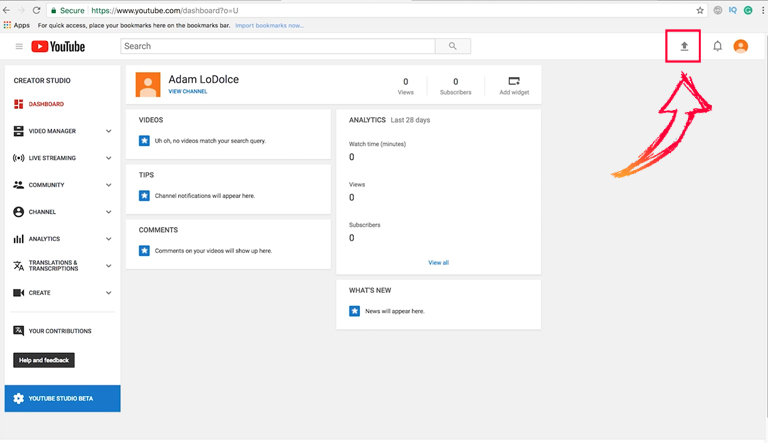
This will take you to the YouTube Upload screen.
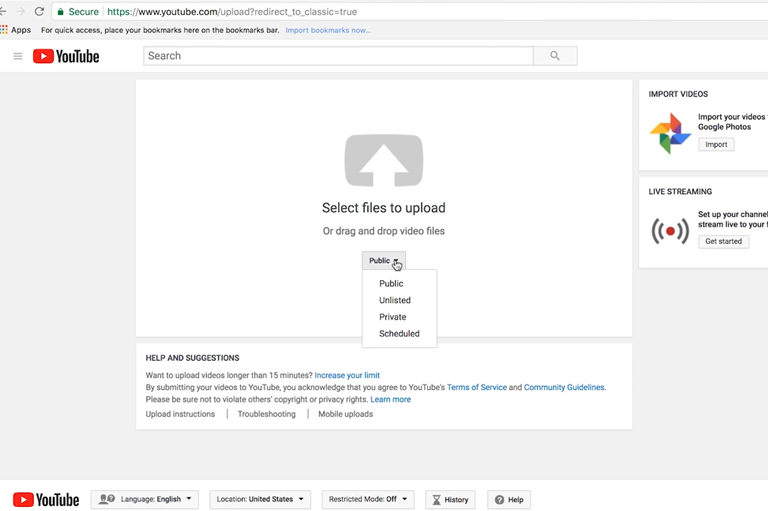
Before you upload your video, take note of the privacy settings.
- Public means your video will be accessible by everyone.
- Unlisted means only people with a link will be able to access your video.
- Private means only you can view the video.
- Scheduled allows you to arrange for the video to be released at a specified date. You may find this setting helpful in the future, when you are more experienced with your channel and start adhering to an upload schedule.
For now, I recommend you select “Private”. (This is a good safety net to prevent viewers from seeing any mistakes we might make. If we accidentally upload the wrong video or forget to input some information, we can rectify the situation before anyone else views it. We will make the video publicly accessible later.)
- Select your video and click “Upload”.
On this next screen, you will be able to monitor your upload status. And while we are here waiting for the video to upload, we can perform a few essential steps to optimize your video.
Optimize your videos
There are four fundamental things that every single one of your YouTube videos must have: title, description, tags, and thumbnail.
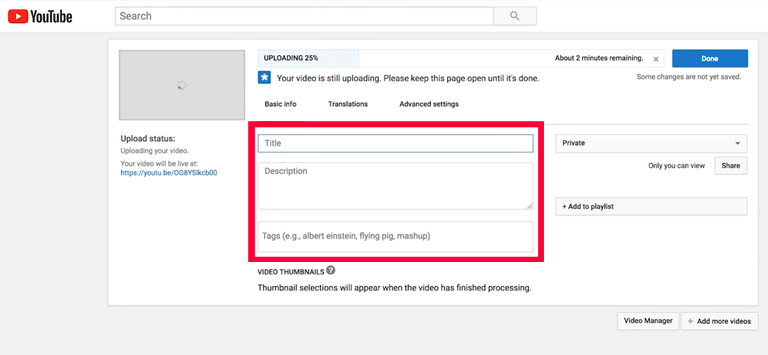
Title
Write a compelling title of around 70 characters in length. Be concise and descriptive about the video you are posting. Your titles should give potential viewers an insight into what your content is about, while also enticing them to click through. Don’t resort to using clickbait or misleading titles. These dishonest tactics lead to a higher bounce rate and lower video rankings!
Description
Include a video description to assist with YouTube’s search and discovery system. Descriptions are a crucial source of information for YouTube’s algorithm. Include clear and specific keywords to help YouTube and viewers understand what your video is about. Prioritize important information and keywords in the first few sentences. The video description is also a good place for calls to action or links to your website and social media accounts.
Tags
Use tags to improve the ranking and visibility of your video. Remember, keywords are king! Consider what words people might use if they were searching for videos like yours. Type in your keyword or phrase (a long-tail keyword) in the “Tags” field, then add a comma or hit enter to confirm.
Never leave these three fields empty. Optimizing your YouTube videos with effective titles, descriptions, and tags is crucial for working with YouTube’s search algorithm. This is how viewers will be able to find your videos.
Also, don’t use misleading titles or tags in an attempt to get more views. Google may penalize you for it.
Thumbnail
Has your video finished uploading?
Finally, we need to select a video thumbnail. Creating a custom thumbnail can be a great way of giving your channel a polished and professional look. But when you first setup a YouTube channel, you may find it easier to utilize the default thumbnails.
YouTube will supply you with several thumbnail suggestions for your video once it has finished uploading. You can use one of these, or create and upload your own thumbnail. Keep in mind that more than half of your audience will be viewing your channel on a mobile device. Be sure to choose a thumbnail that is clear to see on any device!
Make your video public
Now that your video has processed, we can preview it and made sure it has uploaded perfectly.
- Select “Done”.
- It will tell you that “Your video is now ready at…” and provide you with the video URL. Click that link to review your video and its information.
- Once you’re happy, navigate back to your “Creator studio” (via your icon in the top right corner).
- Select “Video manager”.
This is where you will always be able to see every single video that you upload.
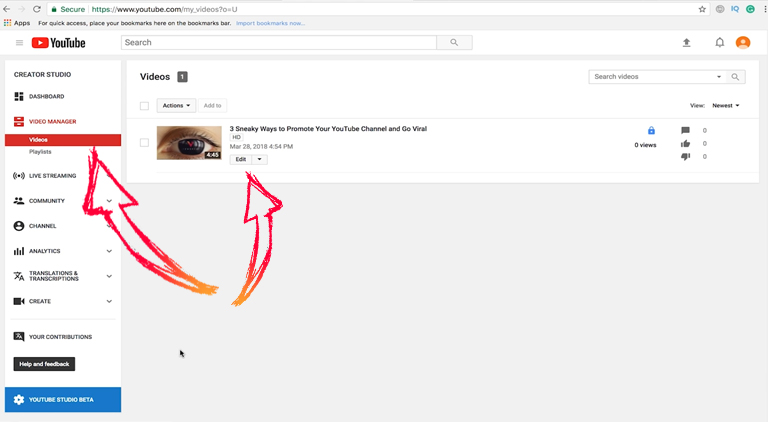
- Select “Edit” on your video. If you ever want to make changes to your title, description, tags or privacy settings, you can do so here.
- Finally, change the privacy settings to “Public” so everyone can find and view your video.
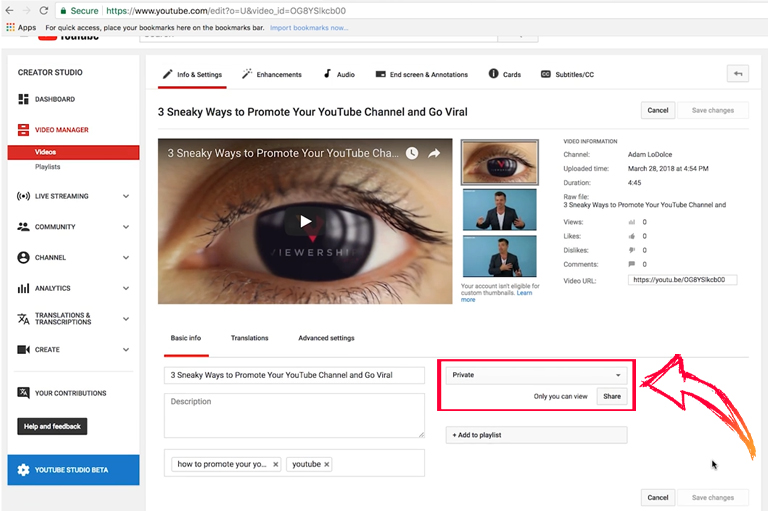
From this screen, you can also add an end screen or annotations, write subtitles, add music or audio, or create other enhancements for your videos. These steps are all a little more complex. You may like to utilize them in the future, but you needn’t worry about them too much for now.
For today, let’s continue to nail the necessary steps to help you setup a YouTube channel successfully and create solid foundations for your future YouTube career.
Add the video to a playlist
Creating keyword-rich playlists is an effective way to improve your YouTube SEO and increase search traffic. These customized libraries will allow you to organize your videos based on topic, theme or other criteria. Playlists will help viewers find content, and ideally encourage them to watch more than one of your videos.
Think about the general categories of the things you are going to talk about in your videos. What topics are you going to cover? What is your niche?
Identify the different topic areas of your intended content and utilize them as playlists. Here’s how to create a YouTube playlist:
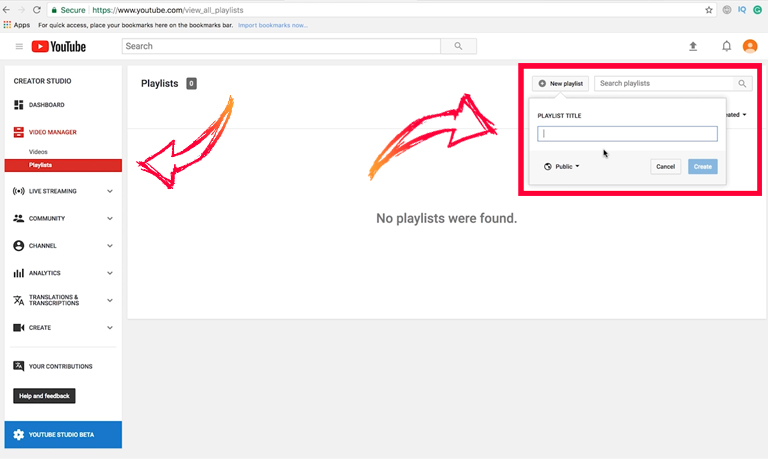
- Under “Video manager” on the left side of your screen, select “Playlists”.
- Click the “New playlist” button and write a title.
- Click “Create”.
Like with individual videos, you should write a description for each playlist.
- Select “Edit”.
- Select “Add a description”.
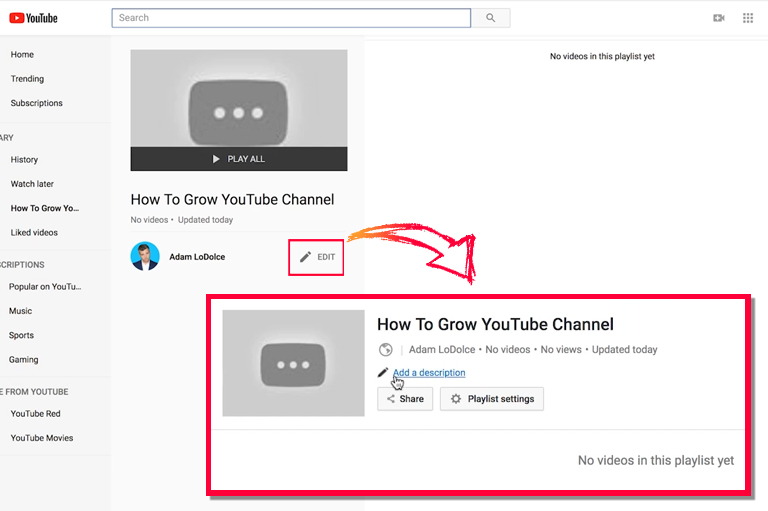
Include relevant keywords and tell your audience what the videos in this playlist are about.
If needed, you can also adjust the settings of your playlist. Simply click the “Playlist settings” button.
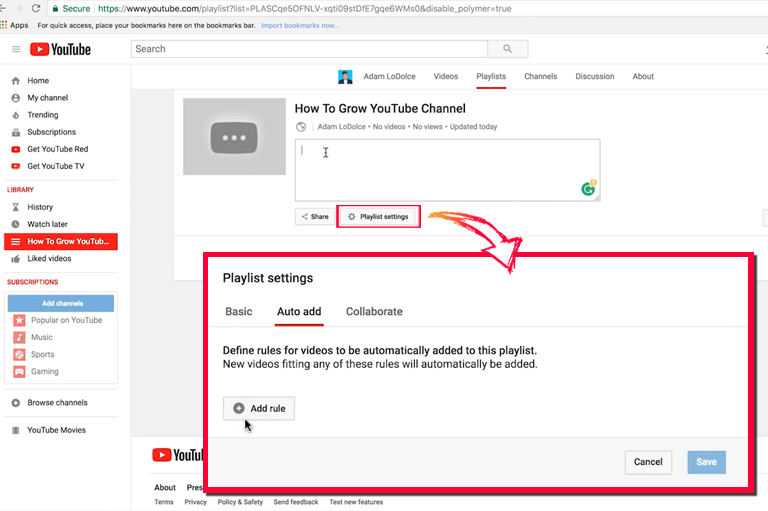
A handy feature here is to “auto add” videos to a playlist. This setting allows you to define rules for videos based on words that appear in the title, description or tags of your video. If your video meets one of these rules, it will be automatically added it to the playlist.
Auto-Add isn’t essential, but you may find it useful when you produce more content. Keeping your playlists up-to-date is hard work, but the Auto-Add feature can help you setup a YouTube channel that is streamlined and consistent.
Step 5: Promote your YouTube channel
You’ve put in the time and effort to setup a YouTube channel with all the bells and whistle. Let’s make sure people can find it!
Here are four ways to promote your YouTube content and improve your online visibility.
Share on social media
One of the first things you should do once you’ve setup a YouTube channel is to tell people about it on social media.
Share your videos on every social media platform imaginable. Facebook might be the best video sharing platform, but there are plenty of other spaces to consider. If your business is on Twitter, LinkedIn, Google+ or other social channels, promote your YouTube channel there too!
Most of all, the goal is to cross-post your content wherever possible for maximum visibility.
Social bookmarking sites, such as PearlTrees or StumbleUpon, can also be excellent referral sources for your content. They create social signals that can help improve your search rankings.
Send an email
Email direct marketing is one of the most effective means of connecting directly with your audience.
Send out an email to your email list to let them know you have setup a YouTube channel. Send emails whenever you post a new video and encourage readers to subscribe to the channel.
Email marketing is a quick, easy and personal form of communication. Send out an email in a matter of minutes, and you could increase your number of views within hours. And that means good things for your YouTube SEO!
Embed your videos
Embedding your videos and sharing buttons are two ways to get your content in front of more people.
Embed your videos wherever you can. Websites, blog posts, forums, social platforms, chat rooms — the more SEO backlinking you create, the more likely your content is going to be found.
Remember that adding video content to your blogs and websites will increase user engagement. These shares can drive your channel’s traffic until it creates organic search traffic and maximizes your reach.
Use Google AdWords
Investing in Google AdWords will allow you to promote your channel to YouTube viewers with PPC (pay-per-click) advertisements. This is an effective advertising strategy that can accelerate your viewership and get your content seen by more people.
Simply connect your YouTube channel to a Google AdWords account, create an ad, set a budget, and set the target audience. You can choose to create in-stream ads (which appear before or after your video) or in-display ads (which appear alongside the video or on the search page).
Conclusion
You made it! You have set up a YouTube channel and optimized it for success. Now the fun part begins!
If you’re just starting out on YouTube and aren’t quite sure where to go from here, stick around. Browse through the Viewership blog for useful videos and articles that will teach you everything you need to know about YouTube.
Plus, we offer free training sessions to help you create a video marketing strategy, make money on YouTube, and build your viewership. Become a true YouTube entrepreneur!
If you have any other questions about how to set up a YouTube channel, leave me a comment below.
Hi Sir i want to know that What is monitizarion how can we enable it as per 2018 policy please answer me.
I don’t even understand how I ended up here, however I thought this post was good.
I don’t know who you’re however certainly you are going to a famous blogger in the event you aren’t
already. Cheers!